Unity Tutorial 1 - Creating a colored cube - Creando un cubo de colores
-----------------------------------------------------------------------------------------------------------------
DISCLAIMER - May 2021
These tutorials were written a long time ago. I did some parts of the code literally the day after installing Unity therefore they could be improved or done differently in many ways. Updating them is definitely in my to-do list but right now I'm currently working in other projects so it will take me time. If you think this content is useful you can follow me on my social media to stay tuned.
AVISO - Mayo 2021
Estos tutoriales fueron escritos hace mucho tiempo. Hice algunas partes del código literalmente el día después de instalar Unity por lo que podrían ser mejorados o realizados de otras maneras. Actualizarlos está definitivamente en mi lista de tareas pero ahora estoy trabajando en otros proyectos y me llevará tiempo. Si piensas que este contenido es útil puedes seguirme en mis redes sociales para estar atento.
-----------------------------------------------------------------------------------------------------------------
English
Hi everyone! Today I decided to write about Unity. I'm far from being an expert in this field (I'm mostly a beginner) but I did learn a few things when I created my app and some of them might be interesting. To create the cube, I've only used Unity so you don't need to use any other software. This is the first tutorial so let's start from the beginning:
Hi everyone! Today I decided to write about Unity. I'm far from being an expert in this field (I'm mostly a beginner) but I did learn a few things when I created my app and some of them might be interesting. To create the cube, I've only used Unity so you don't need to use any other software. This is the first tutorial so let's start from the beginning:
Step #1 Light and Background Color
(I guess by this point you've already installed unity and created a new 3D project) Remove the "Directional Light" component. We don't need it here and the app will work perfectly without it. Then, select the "Main Camera" component and go to "Clear Flags". Select "Solid Color". Under that dropdown menu you will see "Background", click it if you want to change the color. Remember to use a color that doesn't confuse you with the cube.
 |
| Light |
 |
| Background |
Step #2 Adding materials
In this step we will create the materials that we'll use later on the game. To do that, we go to the assets section and create two folders (we don't need to do this but it's better to keep things tidy) "Scripts" and "Materials". Inside "Materials" folder, we create the materials. One material for each color of the cube and another one completely black.
 |
| Creating new material |
In the inspector section, we only need to change a couple things for each material: "Albedo" and we select "Emission". We choose the same * RGB values in "Albedo" and "Color".
 |
| Inspector section for a selected material |
Black: R=0 G=0 B=0
Blue: R=0 G=0 B=255
Green: R=0 G=255 B=0
Orange: R=255 G=123 B=0 * HDR: R=255 G=80 B=0
Red: R=255 G=0 B=0
White: R=255 G=255 B=255
Yellow: R=255 G=255 B=0
Step #3 Adding GameObjects
As I mentioned before, to create this app, I've only used Unity so there might be better ways to do this but this is how I did it. The cube is made entirely with cubes from the 3D Oject menu.
The cube has 8 corners and each corner has 3 colors so we need 24 cubes. For every cube, we only need to change the position and the scale. That can be done with the inspector window. We also have to assign a material. To do this, we can drag from the Project Window to the Hierarchy window. The values of position and scale for the cubes are in the next table:

Once we have created all 24 colored cubes we have to create 6 more (one for each side) which will be black. These 6 additional cubes will be used later to control the movement of the cube (Tutorial 3). The values of position and scale for the cubes are in the next table:

Then, we assign the black material to these cubes and we have finished this tutorial. In the next one I will explain how to control the Main Camera. Bye!
Links:
Step #3 Adding GameObjects
As I mentioned before, to create this app, I've only used Unity so there might be better ways to do this but this is how I did it. The cube is made entirely with cubes from the 3D Oject menu.
 |
| Create Cube |
The cube has 8 corners and each corner has 3 colors so we need 24 cubes. For every cube, we only need to change the position and the scale. That can be done with the inspector window. We also have to assign a material. To do this, we can drag from the Project Window to the Hierarchy window. The values of position and scale for the cubes are in the next table:
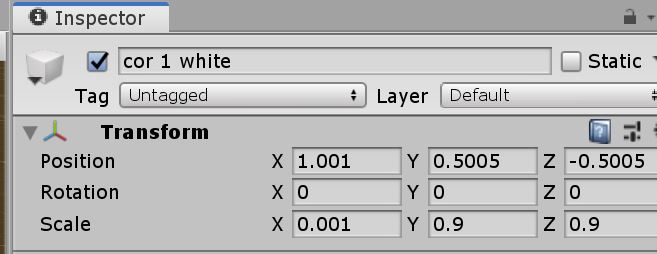 |
| Changing Position and Scale |
Once we have created all 24 colored cubes we have to create 6 more (one for each side) which will be black. These 6 additional cubes will be used later to control the movement of the cube (Tutorial 3). The values of position and scale for the cubes are in the next table:
Then, we assign the black material to these cubes and we have finished this tutorial. In the next one I will explain how to control the Main Camera. Bye!
 |
| Cube after creating 24 colored plates |
 |
| Finished cube |
Tutorial 2 - Camera
Tutorial 3 - Hierarchy, input, code
Tutorial 4 - Coroutines
Español
¡Hola a todos! Hoy decidí escribir sobre Unity. Estoy lejos de ser un experto en este campo (soy mayormente un principiante) pero sí que aprendí algunas cosas cuando creé mi app y algunas de ellas podrían ser interesantes. Para crear el cubo, solo he usado Unity así que no necesitáis ningún otro software. Este es el primer tutorial así que empecemos desde el principio.
¡Hola a todos! Hoy decidí escribir sobre Unity. Estoy lejos de ser un experto en este campo (soy mayormente un principiante) pero sí que aprendí algunas cosas cuando creé mi app y algunas de ellas podrían ser interesantes. Para crear el cubo, solo he usado Unity así que no necesitáis ningún otro software. Este es el primer tutorial así que empecemos desde el principio.
Paso nº1 Luz y color de fondo
(Supongo que para este punto ya habéis instalado Unity y creado un nuevo proyecto 3D) Elimina el componente "Directional Light". No se necesita aquí y la app funcionará perfectamente sin él. Luego, selecciona la "Cámara Principal (Main Camera)" y ve a la casilla "Clear Flags". Selecciona "Solid Color". Debajo de ese menu desplegable verás "Background", haz click sobre él si quieres cambiar el color. Recuerda elegir un color que no te confunda con el cubo.
 |
| Light |
 |
| Background |
Paso nº2 Añadiendo materiales
En este paso vamos a crear los materiales que usaremos más tarde en el juego. Para hacer eso, vamos a la sección "Assets" y creamos dos carpetas (no necesitamos hacer esto pero es mejor mantener las cosas ordenadas) "Scripts" y "Materials". Dentro de la carpeta "Materials", creamos los materiales. Un material para cada color del cubo y otro completamente negro.
 |
| Creando un nuevo material |
En la sección "Inspector", solo necesitamos cambiar un par de cosas para cada material: "Albedo" y seleccionamos "Emission". Elegimos los mismos * valores RGB en "Albedo" y en "Color".
 |
| Sección "Inspector" para un material seleccionado |
Black: R=0 G=0 B=0
Blue: R=0 G=0 B=255
Green: R=0 G=255 B=0
Orange: R=255 G=123 B=0 * HDR: R=255 G=80 B=0
Red: R=255 G=0 B=0
White: R=255 G=255 B=255
Yellow: R=255 G=255 B=0
Paso nº3 Añadiendo GameObjects
Como he mencionado antes, para crear esta app solamente he utilizado Unity así que puede que haya mejores maneras de hacer esto pero así es como yo lo he hecho. El cubo está hecho enteramente con "cubes" del menu 3D Object.
El cubo tiene 8 esquinas y cada esquina 3 colores así que hacen falta 24 "cubes". Para cada cubo, solo necesitamos cambiar la posición y la escala (position y scale). Eso se puede hacer con la ventana inspector. También tenemos que asignar un material. Para ello, podemos arrastrar desde la ventana de proyecto (Project Window) a la ventana de jerarquía (Hierarchy Window). Los valores de posición y escala para los cubos están en la siguiente tabla:

Una vez hemos creado todos los 24 cubos de colores tenemos que crear 6 más (uno por cada cara) que serán de color negro. Estos 6 cubos adicionales se usarán más tarde para controlar el movimiento del cubo (Tutorial 3). Los valores de posición y escala para los cubos están en la siguiente tabla:

Luego, asignamos el color negro para estos cubos y hemos terminado este tutorial. En el siguiente explicaré como controlar la cámara. ¡Adiós!
Enlaces:
Paso nº3 Añadiendo GameObjects
Como he mencionado antes, para crear esta app solamente he utilizado Unity así que puede que haya mejores maneras de hacer esto pero así es como yo lo he hecho. El cubo está hecho enteramente con "cubes" del menu 3D Object.
 |
| Crear Cube |
El cubo tiene 8 esquinas y cada esquina 3 colores así que hacen falta 24 "cubes". Para cada cubo, solo necesitamos cambiar la posición y la escala (position y scale). Eso se puede hacer con la ventana inspector. También tenemos que asignar un material. Para ello, podemos arrastrar desde la ventana de proyecto (Project Window) a la ventana de jerarquía (Hierarchy Window). Los valores de posición y escala para los cubos están en la siguiente tabla:
 |
| Cambiando Position y Scale |
Una vez hemos creado todos los 24 cubos de colores tenemos que crear 6 más (uno por cada cara) que serán de color negro. Estos 6 cubos adicionales se usarán más tarde para controlar el movimiento del cubo (Tutorial 3). Los valores de posición y escala para los cubos están en la siguiente tabla:
Luego, asignamos el color negro para estos cubos y hemos terminado este tutorial. En el siguiente explicaré como controlar la cámara. ¡Adiós!
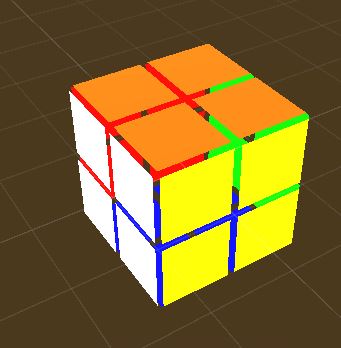 |
| Cubo después de las 24 placas de colores |
 |
| Cubo acabado |
Tutorial 2 - Camera
Tutorial 3 - Hierarchy, input, code
Tutorial 4 - Coroutines
Comments
Post a Comment