Unity Tutorial 2 - Controlling the camera - Controlando la cámara
-----------------------------------------------------------------------------------------------------------------
DISCLAIMER - May 2021
These tutorials were written a long time ago. I did some parts of the code literally the day after installing Unity therefore they could be improved or done differently in many ways. Updating them is definitely in my to-do list but right now I'm currently working in other projects so it will take me time. If you think this content is useful you can follow me on my social media to stay tuned.
AVISO - Mayo 2021
Estos tutoriales fueron escritos hace mucho tiempo. Hice algunas partes del código literalmente el día después de instalar Unity por lo que podrían ser mejorados o realizados de otras maneras. Actualizarlos está definitivamente en mi lista de tareas pero ahora estoy trabajando en otros proyectos y me llevará tiempo. Si piensas que este contenido es útil puedes seguirme en mis redes sociales para estar atento.
-----------------------------------------------------------------------------------------------------------------
English
Hi everyone!! As you've already read from the title, in this tutorial I will explain how to control the game camera. Let's start!
Step #1 Understanding the parameters of the camera
There are 7 parameters to control the camera: 3 for position, 3 for orientation and field of view. The position doesn't require any special explanation. The parameters are the coordinates for the distance in the X,Y,Z axes. In this app, I chose to start with the camera in the position (5,5,5). The cube is centered in the origin (0,0,0) and the camera will be moving around it. To explain the orientation I will use the next image:
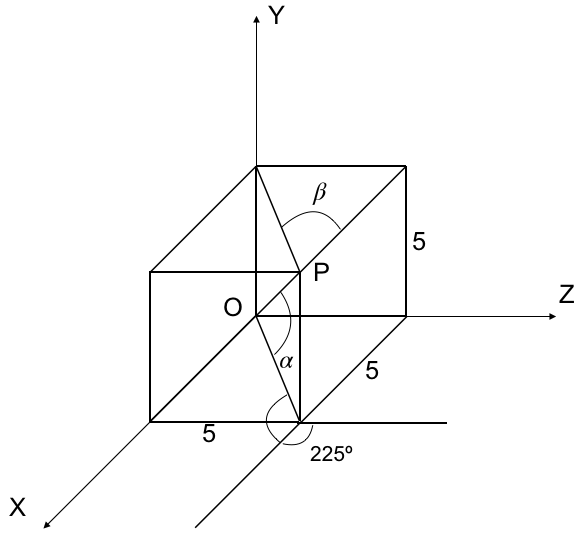 The camera is point P and the cube is point O.
Orientation
X
The parameter X of the orientation corresponds to the alpha angle we see in the image. It's the angle between vector P->O and the XZ plane. In this case it's easy to derive that alpha=35º.
Y
The parameter Y corresponds to the angle 270º-beta(45º)=225º from the picture. It's the angle between the projection of the vector P->O on the XZ plane and the Z axis.
Z
It's always 0º. It's equivalent to turn around the axis OP.
Field of View
I've used 45º.
Step #1 Understanding the parameters of the camera
There are 7 parameters to control the camera: 3 for position, 3 for orientation and field of view. The position doesn't require any special explanation. The parameters are the coordinates for the distance in the X,Y,Z axes. In this app, I chose to start with the camera in the position (5,5,5). The cube is centered in the origin (0,0,0) and the camera will be moving around it. To explain the orientation I will use the next image:
Orientation
X
The parameter X of the orientation corresponds to the alpha angle we see in the image. It's the angle between vector P->O and the XZ plane. In this case it's easy to derive that alpha=35º.
Y
The parameter Y corresponds to the angle 270º-beta(45º)=225º from the picture. It's the angle between the projection of the vector P->O on the XZ plane and the Z axis.
Z
It's always 0º. It's equivalent to turn around the axis OP.
Field of View
I've used 45º.


To move the camera, the first thing we need to do is to add a script. In the "scripts" folder we created in Tutorial 1, we add a new C# file.

| Creating empty Object |


I hope you liked this tutorial, if you want to see more visit:
Tutorial 1 - Light, color, materials
Tutorial 3 - Hierarchy, input, code
Tutorial 4 - Coroutines
Bye!
Español
¡¡Hola a todos!! Como ya habéis leído en el título, en este tutorial explicaré como controlar la cámara del juego. ¡Comencemos!
Paso nº1 Entendiendo los parámetros de la cámara
Hay 7 parámetros para controlar la cámara: 3 para posición, 3 para orientación y campo de visión (field of view). La posición no requiere ninguna explicación especial. Los parámetros son las coordenadas para la distancia en los ejes X,Y,Z. En esta app, elegí empezar con la cámara en la posición (5,5,5). El cubo está centrado en el origen (0,0,0) y la cámara se moverá a su alrededor. Para explicar la orientación usaré la siguiente imagen:
La cámara es el punto P y el cubo es el punto O.
Orientación
X
El parámetro X de la orientación corresponde con el ángulo alfa que vemos en la imagen. Es el ángulo entre el vector P->O y el plano XZ. En este caso es fácil obtener que alfa=35º.
Y
El parámetro Y corresponde con el ángulo 270º-beta(45º)=225º del dibujo. Es el ángulo entre la proyección del vector P->O en el plano XZ y el eje Z.
Z
Siempre vale 0º. Es equivalente a girar alrededor del eje OP.
Campo de visión - Field of View
He utilizado 45º.
 Una vez cambiamos estos parámetros, veremos esto:
 Paso nº2 Mover la cámara
para mover la cámara, lo primero que debemos hacer es añadir un script. En la carpeta "scripts" que creamos en el Tutorial 1, añadimos un nuevo archivo C#.
 Después de eso, necesitamos poder acceder a todos los GameObjects de la escena. Hay varias maneras de hacer esto. Lo que yo hice, fue crear un objeto vacío y ligarlo al script:
 Para vincular el objeto con el script podemos arrastrar y soltar de la ventana Project a la ventana Hierarchy o seleccionar add Component->Script->seleccionamos nuestro script. Al final tenemos que ver esto:


 Así que la mejor manera de manejar esta situación es usar coordenadas esféricas. Las teclas arriba y abajo modificarán el ángulo alfa y las teclas izquierda y derecha modificarán el ángulo beta:
 En este caso el radio r es la distancia entre O y P:
 Después, añadimos algunas variables:
 Finalmente, añadimos el código necesario en el método update para mover y rotar la cámara de acuerdo a la entrada recibida por las flechas.
 El parámetro Time.deltaTime por el que multiplicamos la velocidad angular, es usado para mover la cámara a la misma velocidad independientemente del dispositivo en el que estemos jugando. Será explicado con más detalle en el cuarto tutorial.
Espero que le haya gustado este tutorial, si quiere ver más visite:
¡Adiós!
Paso nº1 Entendiendo los parámetros de la cámara
Hay 7 parámetros para controlar la cámara: 3 para posición, 3 para orientación y campo de visión (field of view). La posición no requiere ninguna explicación especial. Los parámetros son las coordenadas para la distancia en los ejes X,Y,Z. En esta app, elegí empezar con la cámara en la posición (5,5,5). El cubo está centrado en el origen (0,0,0) y la cámara se moverá a su alrededor. Para explicar la orientación usaré la siguiente imagen:
Orientación
X
El parámetro X de la orientación corresponde con el ángulo alfa que vemos en la imagen. Es el ángulo entre el vector P->O y el plano XZ. En este caso es fácil obtener que alfa=35º.
Y
El parámetro Y corresponde con el ángulo 270º-beta(45º)=225º del dibujo. Es el ángulo entre la proyección del vector P->O en el plano XZ y el eje Z.
Z
Siempre vale 0º. Es equivalente a girar alrededor del eje OP.
Campo de visión - Field of View
He utilizado 45º.


para mover la cámara, lo primero que debemos hacer es añadir un script. En la carpeta "scripts" que creamos en el Tutorial 1, añadimos un nuevo archivo C#.


Una vez hemos vinculado script y objeto podemos empezar a escribir código. Tenemos tres partes en nuestro script: los métodos start y update y la parte antes del método start. En el método start y la parte encima de él podemos definir las variables y objetos que modificaremos después en el método update para modelar nuestro juego. En este caso, para definir la cámara, hacemos esto:

Como ya se ha mencionado anteriormente, el cubo estará fijo en el origen (0,0,0) y la cámara se moverá a su alrededor, empezando desde el punto (5,5,5). Usaremos las flechas del teclado. Es complicado modificar las coordenadas xyz del punto P directamente con las flechas del teclado porque las teclas izquierda y derecha moverán la cámara en el plano XZ pero las flechas arriba y abajo la moverán en los planos YZ y XY. Vean el siguiente dibujo:

Espero que le haya gustado este tutorial, si quiere ver más visite:
Tutorial 1 - Light, color, materials
Tutorial 3 - Hierarchy, input, code
Tutorial 4 - Coroutines
¡Adiós!
Comments
Post a Comment