Unity Tutorial 3 - Control of the cube - Control del cubo
-----------------------------------------------------------------------------------------------------------------
DISCLAIMER - May 2021
These tutorials were written a long time ago. I did some parts of the code literally the day after installing Unity therefore they could be improved or done differently in many ways. Updating them is definitely in my to-do list but right now I'm currently working in other projects so it will take me time. If you think this content is useful you can follow me on my social media to stay tuned.
AVISO - Mayo 2021
Estos tutoriales fueron escritos hace mucho tiempo. Hice algunas partes del código literalmente el día después de instalar Unity por lo que podrían ser mejorados o realizados de otras maneras. Actualizarlos está definitivamente en mi lista de tareas pero ahora estoy trabajando en otros proyectos y me llevará tiempo. Si piensas que este contenido es útil puedes seguirme en mis redes sociales para estar atento.
-----------------------------------------------------------------------------------------------------------------
English
Hi everyone!! In this tutorial we'll continue our small cube game for Unity. Let's begin!
Step #1 Regroup Hierarchy window
The first thing we're going to do is to regroup the hierarchy window so we don't have to access all 24 corners GameObjects we created before. Instead, we'll make groups of three corners by dragging and dropping. In the end, the result should look like this:
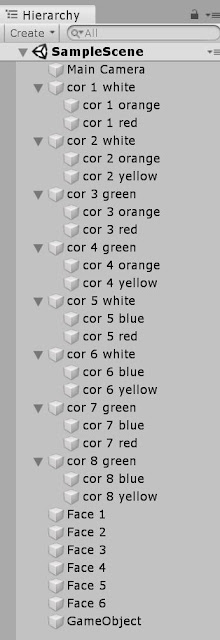 If we look at "corner 1 white", we can see "corner 1 orange" and "corner 1 red" forming a group under it. This means that now "corner 1 orange" and "corner 1 red" are children of "corner 1 white". Whatever movement we apply to the parent gameobject, the children gameobjects will move the same way.
Step #2 Access GameObjects
Now that we have regrouped the hierarchy window, we can start accessing the parent corners in our script. This will be done in the start method but before we must declare them:
Step #3 Keeping track of the positions of the corners
At this point, it's essential to define how the cube is going to move. In the next two pictures you can see the criteria I chose:
Every time we press one number from 1 to 6 we will also turn the corresponding face one quarter. I've also declared the array "posvec" to know exactly which corner is currently in which position.
The auxiliar variables auxA, auxB, auxC, auxD will be used later to swap the gameobjects inside the array posvec.
Step #4 Turnface method
For each face, the method defines which corners will be children of the face that is going to turn. Then, it swaps the corresponding gameobjects and, at the end, it cancels the hierarchy again:


Step #1 Regroup Hierarchy window
The first thing we're going to do is to regroup the hierarchy window so we don't have to access all 24 corners GameObjects we created before. Instead, we'll make groups of three corners by dragging and dropping. In the end, the result should look like this:

Step #2 Access GameObjects
Now that we have regrouped the hierarchy window, we can start accessing the parent corners in our script. This will be done in the start method but before we must declare them:
 |
| Before Start method |
 |
| Inside Start method |
Step #3 Keeping track of the positions of the corners
At this point, it's essential to define how the cube is going to move. In the next two pictures you can see the criteria I chose:
 |
| Corners |
 |
| Faces and turns |
| Before the start method |
| Inside the start method |
Step #4 Turnface method
For each face, the method defines which corners will be children of the face that is going to turn. Then, it swaps the corresponding gameobjects and, at the end, it cancels the hierarchy again:


Step #5 Handling the input in the Update method
Now all we have to do is to manage the user input in the Update method:
 That is the end of Tutorial 3. At this point the game is fully functional but the movement is so fast that we don't get to see how the cube is turning. In the next tutorial we'll learn about coroutines so we can simulate a real world cube. If you want to find out more, visit:
Bye!

Tutorial 1 - Light, color, materials
Tutorial 2 - Camera
Tutorial 4 - Coroutines
Bye!
Español
¡¡Hola a todos!! En este tutorial continuaremos nuestro juego del cubo pequeño para Unity. ¡Comencemos!
Paso nº1 Reagrupar la ventana jerarquía (Hierarchy window)
La primera cosa que vamos a hacer es reagrupar la ventana de jerarquía para que no tengamos que acceder a todos las 24 esquinas GameObjects que creamos anteriormente. En su lugar, haremos grupos de tres esquinas arrastrando y soltando. Al final, el resultado debería quedar así:
Si miramos "corner 1 white", podemos ver "corner 1 orange" y "corner 1 red" formando un grupo debajo. Esto significa que ahora "corner 1 orange" y "corner 1 red" son hijos de "corner 1 white". Cualquier movimiento que apliquemos al gameobject padre, los gameobjects hijos se moverán de la misma manera.
Paso nº2 Acceder a los GameObjects
Ahora que hemos reagrupado la ventana de jerarquía, podemos empezar a acceder a las esquinas padre en nuestro script. Esto se hará en el método start pero antes tenemos que declararlas:
Paso nº3 Siguiendo las posiciones de las esquinas
En este punto, es esencial definir como se va a mover el cubo. En las siguientes dos imágenes podéis ver el criterio que elegí:
Cada vez que pulsemos un número del 1 al 6 giraremos también la cara correspondiente un cuarto. También he declarado el array "posvec" para saber exactamente que esquina esta en cada posición en cada momento.
Las variables auxiliares auxA, auxB, auxC, auxD serán usadas después para intercambiar los gameobjects dentro del array posvec.
Paso nº4 método Turnface
Para cada cara, el método define que esquinas serán hijas de la cara que va a girar. Luego, intercambia los objetos correspondientes y, al final, cancela de nuevo la jerarquía:
Paso nº1 Reagrupar la ventana jerarquía (Hierarchy window)
La primera cosa que vamos a hacer es reagrupar la ventana de jerarquía para que no tengamos que acceder a todos las 24 esquinas GameObjects que creamos anteriormente. En su lugar, haremos grupos de tres esquinas arrastrando y soltando. Al final, el resultado debería quedar así:
Paso nº2 Acceder a los GameObjects
Ahora que hemos reagrupado la ventana de jerarquía, podemos empezar a acceder a las esquinas padre en nuestro script. Esto se hará en el método start pero antes tenemos que declararlas:
|
| Antes método Start |
|
| Dentro del método Start |
Paso nº3 Siguiendo las posiciones de las esquinas
En este punto, es esencial definir como se va a mover el cubo. En las siguientes dos imágenes podéis ver el criterio que elegí:
|
| Esquinas |
|
| Caras y giros |
| Antes del método start |
| Dentro del método start |
Paso nº4 método Turnface
Para cada cara, el método define que esquinas serán hijas de la cara que va a girar. Luego, intercambia los objetos correspondientes y, al final, cancela de nuevo la jerarquía:
Paso nº5 Manejando las entradas en el método Update
Ahora todo lo que nos queda por hacer es gestionar la entrada del usuario en el método Update:
Este es el final del Tutorial 3. En este punto el juego es totalmente funcional pero el movimiento es tan rápido que no podemos ver como el cubo gira. En el siguiente tutorial aprenderemos de corrutinas para que podamos simular un cubo real. Se queréis saber más, visitad:
¡Adiós!
Tutorial 1 - Light, color, materials
https://www.curiousruben.com/2020/07/unity-tutorial-1-creating.html
Tutorial 2 - Camera
Tutorial 4 - Coroutines
¡Adiós!
Comments
Post a Comment